Sunday, September 29, 2013

Me & You

Me & You!
I wanted to make this for my husband.  Something nice just
to tell him how much he means to me.
I liked the sketch challenge from the Sweet Stop Challenge blog.
They always have great sketches.


I used some really antique looking paper from Simple Stories - Documented.
I also used some brown paper to use behind my stamp.
I wanted it to have a leathery/antiquey look.  I thought it made for a nice touch.
I tore the brown paper first, then I wet the paper.  I know, that was really hard for me to do.  (I'm still trying to get used to this process.)  Next I crumpled the paper up, unwaded it, then let it dry out.  I found that if you can put it in front of a fan without it blowing away, then it dries a lot faster.
It gave the paper a nice look for this project.
 
And I was so excited!!  I found a stamp that I had been admiring for some
time, but I didn't know who made the stamp.  But this past weekend, I found it!
It is Explorer made by Penny Blossom. 
They have some really fabulous digi stamps.  You MUST check them out.
And they even offer a freebie.  That way you can try it first.  But I had to buy more of course.  They are really great!
 
Next I decided to add another magnifying glass.  One that I could write "YOU" in.  Then I used my Tim Holtz numbers to trace out the "&" sign.
 
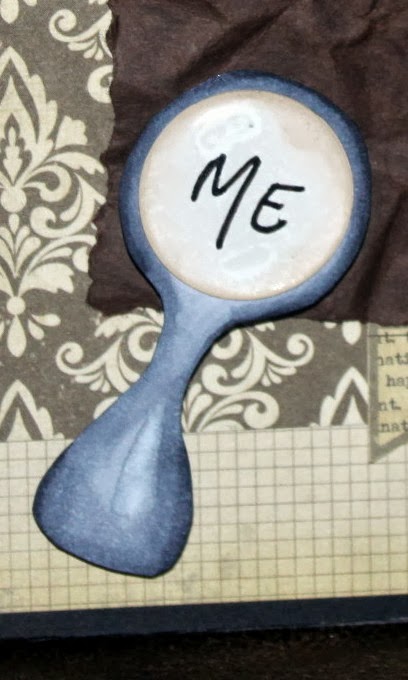
I was really proud of myself for making this magnifying glass.  I'm not really a drawer, so it was a miracle that I was able to draw it.
I used the Epiphany circle cutter and the bubble caps to make it look
more like a magnifying glass.
 
I would like to enter this into the following challenges:
Sweet Stop - sketch challenge
2 Sisters Challenge Blog - Anything Goes


Wednesday, September 25, 2013

Sunflowers!

Good Afternoon!
I hope everyone is having a great middle of the week today!
This is our month end and year end at work, and it's going to be a little crazy.
But I wanted to start the week off with a little crafting.
 
I have a Bridal Shower to attend and wanted to make something
special for the Bride -To- Be.
Her wedding colors are natural with Teal, and they will be carrying sunflowers.
How pretty will that be?
 
I used papers from DCWV Kidlet stack and DCWV Industrial Chic stack.
I just love DCWV papers.
Then I added some pretty lace/ribbon to the edge, and 3 shell buttons.
I used a digi stamp I had from Saturated Canary.  They are great stamps.
 
I made the sunflower from a tutorial I found at www.littlethingscreations.com.
It was a lot easier to make the sunflower than I thought it was going to me.
Since it is going to be an Autumn wedding, I thought the sunflower was perfect.
 
 
I would like to enter this into the following challenges:


Thursday, September 19, 2013

Pirates & Treasure!

I don't know if you all know this or not, but today
was "Talk Like A Pirate Day."  No I'm not joking.  How funny is that?
 
Over at Sassy Studio Designs blog they are having a cool new challenge this week.  Yep, you guess it. . . PIRATES!
Ok, I have had this cute little Pirate/Masquerade stamp from Sassy Studio Designs for a while, and I haven't really gotten to use it much.
 
 
I just love this Sassy Studio digi stamp! She's just so SASSY!!
 
For this card I made a template to make the treasure chest with. Then I colored the edges with some warm gray Copic markers to add a little shading to the Authentique paper that I chose.
 
I used a digital stamp to make the map. Then I got a little creative.
To make the map look worn, I tore it a little, then I colored it to age it.
After that, I took a finger nail file to the edges to rough it up a little.
Next I wet it, crumpled it up, then unrolled it to dry.
I added a few gold "coins", some pearls, and some rubies.  Because every treasure chest needs, well, treasure.
 
I have really enjoyed making this card. It was soooo much fun!
 
I want to enter this into the Sassy Studio Designs challenge this week - Pirates.
 
I would also like to enter this into the following challenges:
4 Krafty Girlz Challenges - Anything Goes
Paper Pretties Challenge Blog - School Colors (and I got to use the mascot too!)
Divas By Design - Anything Goes
Corrosive Challenge Blog - Maiden, Mother, Crone


Sunday, September 15, 2013

Saturated Canary Shabby Chic

I hope everyone had a fabulous weekend.
I had a nice peaceful weekend with my daughter.
She worked on a wreath she has been making, and I did a little scrapbooking.
 
I love the Saturated Canary digi stamps.  And I love shabby chic.
So their latest challenge is right up my alley.


I used my newest shabby chic roses that I have been making, some of my favorite lace, a couple of buttons, a couple of antique-looking brads, and a really sweet little antique finish heart locket with a small bow attached.
 
I used paper from DCWV Jewel stack, DCWV Glitter stack, DCWV Chateau Lavender stack, and some pretty paper from Paper-Studios.
 
The flowers were made from Lost & Found collection.
I used my Tim Holtz flower die cuts.  I used the small and the larger 5 petal flower dies on the Lost & Found paper.  I used a couple of different patterns.
Next, I put each flower in water, wadded them up, then very carefully unfolded them.  Just be careful that they don't tear.  You can shape them a little if you want.  After they dry, pick about 2 or 3 larger flowers and 2 smaller ones, assemble them, and add a pretty brad to hold them all together.
These are super easy, and look very shabby chic.
 
And of course the stamp is from Saturated Canary.
I colored it with my favorite Copic markers and a little bit of glitter.
I love the Shabby Chic look, but I love glitter too.
 
I want to enter this into the following challenges:
Sassy Studios - Shabby Chic
A Creative Romance - Dies or Punches (used on the flowers)
Mema's Crafts - Flowers & Lace
Glitter N Sparkle - Add Some Pink
Challenges 4 Everybody - Anything Goes
Card Mania Challenges - Favorite Color Combination
4 Krafty Girlz Challenges - Anything Goes
Paper Pretties - Distress (I distressed my flowers)


Sunday, September 8, 2013

So Magical

My mother bought me some new stamps that she found this past week.
They are a little different than any that I have used before, so I thought I would give them a try this weekend and see what I could come up with.
 
 
I used some scrap paper from my scrap stash, which is always useful.
I added some gold glittered letters which I made using my Big Kick and Curlz alphabet.  Then I added some clear epoxy and gold glitter around 2 sides of the card.  I also took a metallic gold stamp pad and slightly inked around the edges of the yellow and black papers.
 
I used my Copic markers to color this colorful Mystical Creature.
After I colored him, I used some really cook Glittering H2O paints.
Some lt green, purple, gold, and pewter for the smoke.

 
These paints are super easy to use and last a really long time.
All you have to do is add just a little bit of water and get it on your paintbrush
and just paint the area you want covered.
It leaves a really pretty glittery look, which I thought
would be appropriate for this creation.
I tore the edges around the dragon for a little added dimension.
 
I would like to enter this into the following challenges:
 
Divas by Design - Water Theme (used Glittering H2O paints)
Emerald Faeries Challenge Blog - Magical Creatures
Dream Valley Challenges - Purple & Green


Saturday, September 7, 2013

It's Your Day!

Since my daughter created the birthday cakes, I created the birthday card.
My daughter's second birthday cake was for a fairy party.
She used Tinkerbelle as her inspiration for the colors.


My daughter is going to put the Tinkerbelle doll in the center of the cake
for the party tomorrow.
She made this for her sweet little God-Sister who is turning 2 this week.
She used the bright color flowers which makes it very cheerful.
 
My God-Daughter not only loves bright colors
and fairies, but she also loves pigs. 
They live on a farm but they don't raise pigs, they raise cattle.
 
So I made the card with pigs.
  
 
I used Creative Imaginations Birthday Bliss papers.
A couple of cute buttons, and my newest stamps from
Bugaboo Stamps - Pig Party.
Isn't the cute little pig just adorable?
If you haven't checked out Bugaboo Stamps lately, you really need to.
They have some super cute digi stamps.
 
I got the layout from this card from the Sweet Stop Sketches blog site.
They always have some really cute sketches.  I just love them!
 

Beach Time!

I have to brag today on my daughter.
She hasn't been posting anything up here lately because she has been too busy with school and dance classes/competitions.
But today she has been busy baking 2 birthday cakes.
One has a really cool beach theme.
 
It is a white chocolate cake with white chocolate buttercream frosting.
It is absolutely to die for!
 
 
Here is a close up showing off the fish and the "wet" sand.
She made an adorable beach ball and 2 beach towels.
There is also some shells and a couple of starfish.
How cool is that?

 
She used gum paste to make the beach towels, beach ball, fish, starfish, and shells.  She just colored each piece to what color she wanted and then cut
the shapes out she wanted.  The fish are yellow and cut out kind of like
the little "Goldfish" crackers.  The sand is light brown sugar, and the "wet" sand is, believe it or not, dark brown sugar.  LOL!
 
She is getting better and better at her cake decorating.
But more importantly, her cakes taste INCREDIBLE!!!
I am so proud of her.


Friday, September 6, 2013

Paris Vacation

Happy Weekend!!
I am so ready for a couple of days off of work.  It seems like the shorter the week, the longer it takes to get to the weekend.
 
So, I have decided I wanted to make something a little different today.
Sassy Studios is having a Guest Designer call, and I thought I would
try to make something to enter in their challenge.
 
I used some Authentique and My Mind's Eye papers.
I used some of my favorite lace and some pretty white fabric flowers.
I added a pretty cool vintage postcard that I reduced in
size as a little extra touch. 
And of course my Sassy Studio stamp.
I made it into a picture with some glitter paper as the background.


I really like the colors in the papers. 
 And I really like the Eifel Tower the striped paper.
That's what actually inspired me to add the vintage postcard.
 
I would also like to enter this into the following challenges:
Mema's Crafts - Lace & Flowers
MOJO Monday - Sketch Challenge
Love To Scrap - Anything Goes
Glitter & Sparkle - Anything Goes
Challenges 4 Everybody - Anything Goes
Avenue 613 - Anything Goes
Sassy Studios - Guest Designer Call
4 Krafty Girlz Challenges - Anything Goes


Wednesday, September 4, 2013

Cheerful Birthday

Happy Wednesday Everybody!
I hope you're having a great week so far. 
It's been a beautiful week here which always makes everyone happier
 
I wanted to share a birthday card I made for my Aunt this week.
She is very special to me, so I wanted to make something very cheery.
 
I used the sketch design from MOJO Monday.  I just love their sketches.
 
 
And here's my take on their sketch.
 
 
I used some pretty summery papers from my stash.
I love all the yellows and pinks, and greens together.  And especially
with all the different designs.
I added a little bit of lace I had.
Lastly I added some shabby chic roses that were handmade.
These were made using the technique Holly used to make her violets.
See Holly's House Mouse Violets below for the directions.
 
I really liked the cheerfulness this card shows.
 
I would like to enter this in the challenges listed below:
 
MOJO Monday - Sketch Challenge       Mema's Crafts - Flowers & Lace   
Avenue 613 - Anything Goes                    Challenges 4 Everyboday - Anything Goes
Love to Scrap - Anything Goes


Tuesday, September 3, 2013

House Mouse Violets

I hope everyone had a great weekend.
We had a great Labor Day weekend!

I spent the whole weekend with my daughter and mother at
a Labor Day Festival in our hometown.
 
My mother makes handmade beaded jewelry.
She makes beautiful jewelry with real stones. Just beautiful!
We used to do it together, but I have given up my half of the
 booth to my daughter.
 
My daughter sold home made cupcakes that were the best!
White chocolate cake with white chocolate buttercream frosting,
Key Lime, and a fabulous Reece Cup like cupcake.  They are sooo good!
I don't even want to think about how many pounds I have put on
since she has started her baking business Life Is Sweet Treats.
I just help out with both of them now.
 
But today, I'm back to my favorite. . .scrapbooking and paper crafts.
 
I wanted to share my latest creation. 
I think it might be my favorite.  That may just be because I used
my favorite flowers in the project. . . violets.  I just love them!
 
 
I used the sketch from the CLP Challenge Blog
 
 
I used my favorite House Mouse stamp.  Of course it would have violets.
I used the most beautiful papers from Maya Road and DCWV Chateau Lavender.
Some gorgeous lace and pretty glittering ribbon.
 
I used some chipboard that I recently received from a
really neat company that I just found - Stay True To God.
These are really nice people who have some wonderful wooden
cutouts, and some really fabulous papers, like the
Maya Road paper are which is from Sweden.
They don't carry the normal things everyone else does.  They carry some
different things that are really fun to use.  The only problem you might have with them, is knowing when to stop.  I just can't wait to reorder!
 
And I added some pretty violets.
Since I couldn't find any violets at the scrapbooking store,
I decided to make my own.
 
 
I used my Tim Holtz flower die, just the small one.
I picked two different kinds of purple scrap paper I had laying around.
After I use the die on the paper, I used the Versa Fine ink to
 go around the edges of the small flowers.
Next I put the flower in water.  Just cover it with the water and take it out.
I know that sounds crazy, but it gets worse.
After the flower is soaked, wad it up in a small ball.
No, I'm really not kidding.  This really works.
After you get it wadded up, and please be careful.  Remember it is just paper.
Very carefully undo the petals of the flowers, and shape them.
You can add small yellow crystals to the center to make them look
more like violets.
 
You can use this technique for other flowers too.
You will need to use 2 or 3 different sizes of the flowers, some different patterns, and a brad.  After the flowers dry completely, punch a small hole in the center of the flowers and add a pretty brad for the flower center.
I have used it to make some really pretty shabby chic flowers. 
GOOD LUCK!
 
 
I would like to enter this card into the following challenges:
CLP Challenge Blog - Sketch Challenge
Mema's Crafts - Flowers & Lace
Avenue 613 - Anything Goes
Alphabet Challenge Blog - "O" One Word Sentiment
Challenges 4 Everybody - Anything Goes